There’s something magical about the gentle sound of trickling water in your garden. I still remember building my first DIY water fountain—the pride I felt when water began flowing through my creation, transforming my ordinary garden into a tranquil retreat. That soothing sound instantly became the background melody to my morning coffee and evening relaxation sessions. Whether you’re looking to create a focal point in your landscape, attract birds and beneficial wildlife, or simply add the therapeutic sounds of flowing water to your outdoor space, a DIY water fountain project delivers immense satisfaction without breaking the bank.
In this comprehensive guide, I’ll walk you through creating your own DIY water fountain in just five easy steps. From selecting materials to final decoration touches, you’ll discover how simple it can be to build a stunning water feature that will elevate your garden’s ambiance and become your favorite outdoor spot.
Table of Contents
Why Build Your Own DIY Water Fountain?
Before diving into the how-to, let’s explore why creating a homemade water fountain might be one of your most rewarding garden projects:
- Cost-effective: Building your own fountain can save 50-70% compared to store-bought options
- Customization: Design a water feature that perfectly complements your garden’s style and space
- Personal satisfaction: Experience the pride of creating something beautiful with your own hands
- Therapeutic benefits: Enjoy the proven stress-reducing effects of flowing water sounds
- Wildlife attraction: Create a habitat that draws birds, butterflies, and beneficial insects
- Property value: Add an appealing feature that can increase your home’s market appeal
Essential Materials and Tools for Your DIY Water Fountain
Basic Materials Needed:
- Water pump (submersible, 120-350 GPH depending on fountain size)
- Waterproof basin or container
- Flexible tubing (appropriate diameter for your pump)
- Decorative elements (stones, pottery, sculptures, etc.)
- Waterproof sealant
- Wire mesh or grate (for supporting decorative elements)
- Outdoor-rated electrical extension cord (if needed)
Tools Required:
- Drill with masonry bits
- Utility knife
- Level
- Measuring tape
- Safety gloves
- Shovel
- Wire cutters
Cost Comparison: DIY vs. Store-bought Fountains
| Fountain Type | Average DIY Cost | Store-bought Equivalent | Savings |
|---|---|---|---|
| Small Tabletop | $30-$75 | $100-$200 | 62-70% |
| Medium Container | $75-$150 | $200-$500 | 62-70% |
| Large Statement | $150-$300 | $500-$1,200 | 70-75% |
| Solar-powered | $100-$200 | $250-$600 | 60-67% |
Step 1: Plan and Design Your DIY Water Fountain
The foundation of a successful DIY water fountain project lies in thoughtful planning and design. This initial step sets the tone for your entire project.
Choosing the Perfect Location
When selecting a spot for your DIY water fountain, consider:
- Sunlight exposure: Too much direct sun can lead to algae problems and water evaporation
- Proximity to electrical outlets: Unless using solar power, you’ll need access to electricity
- Visibility: Position where you can enjoy the fountain from key viewing areas
- Sound distribution: Consider how the water sounds will travel in your space
- Surrounding landscape: Ensure it complements existing garden elements
Selecting Your Fountain Style
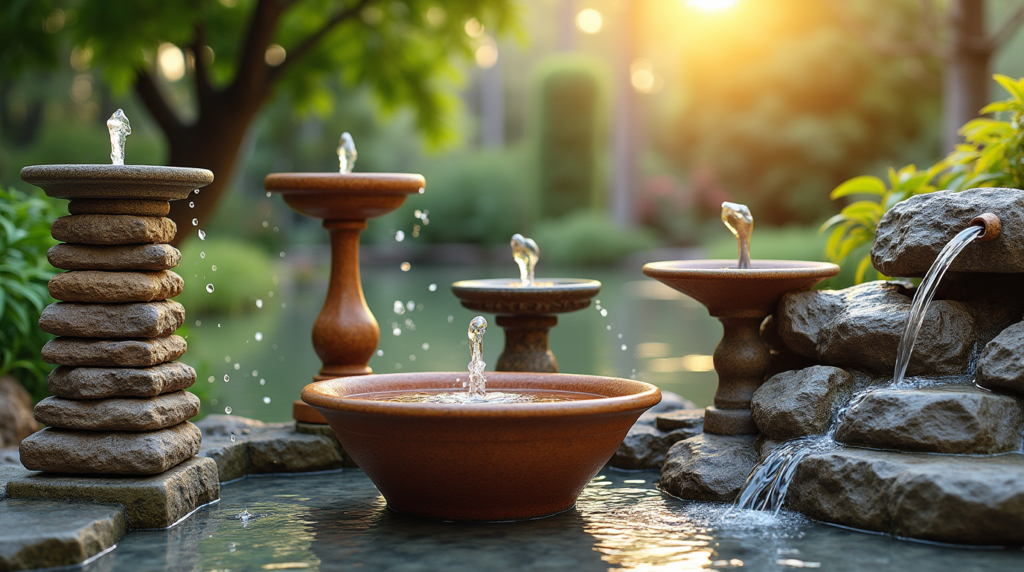
The beauty of a DIY water fountain is the freedom to create something uniquely yours. Here are popular styles to consider:
- Container fountain: Using decorative pots, urns, or basins
- Disappearing fountain: Water appears to vanish into stones or gravel
- Wall fountain: Mounted against a wall or fence
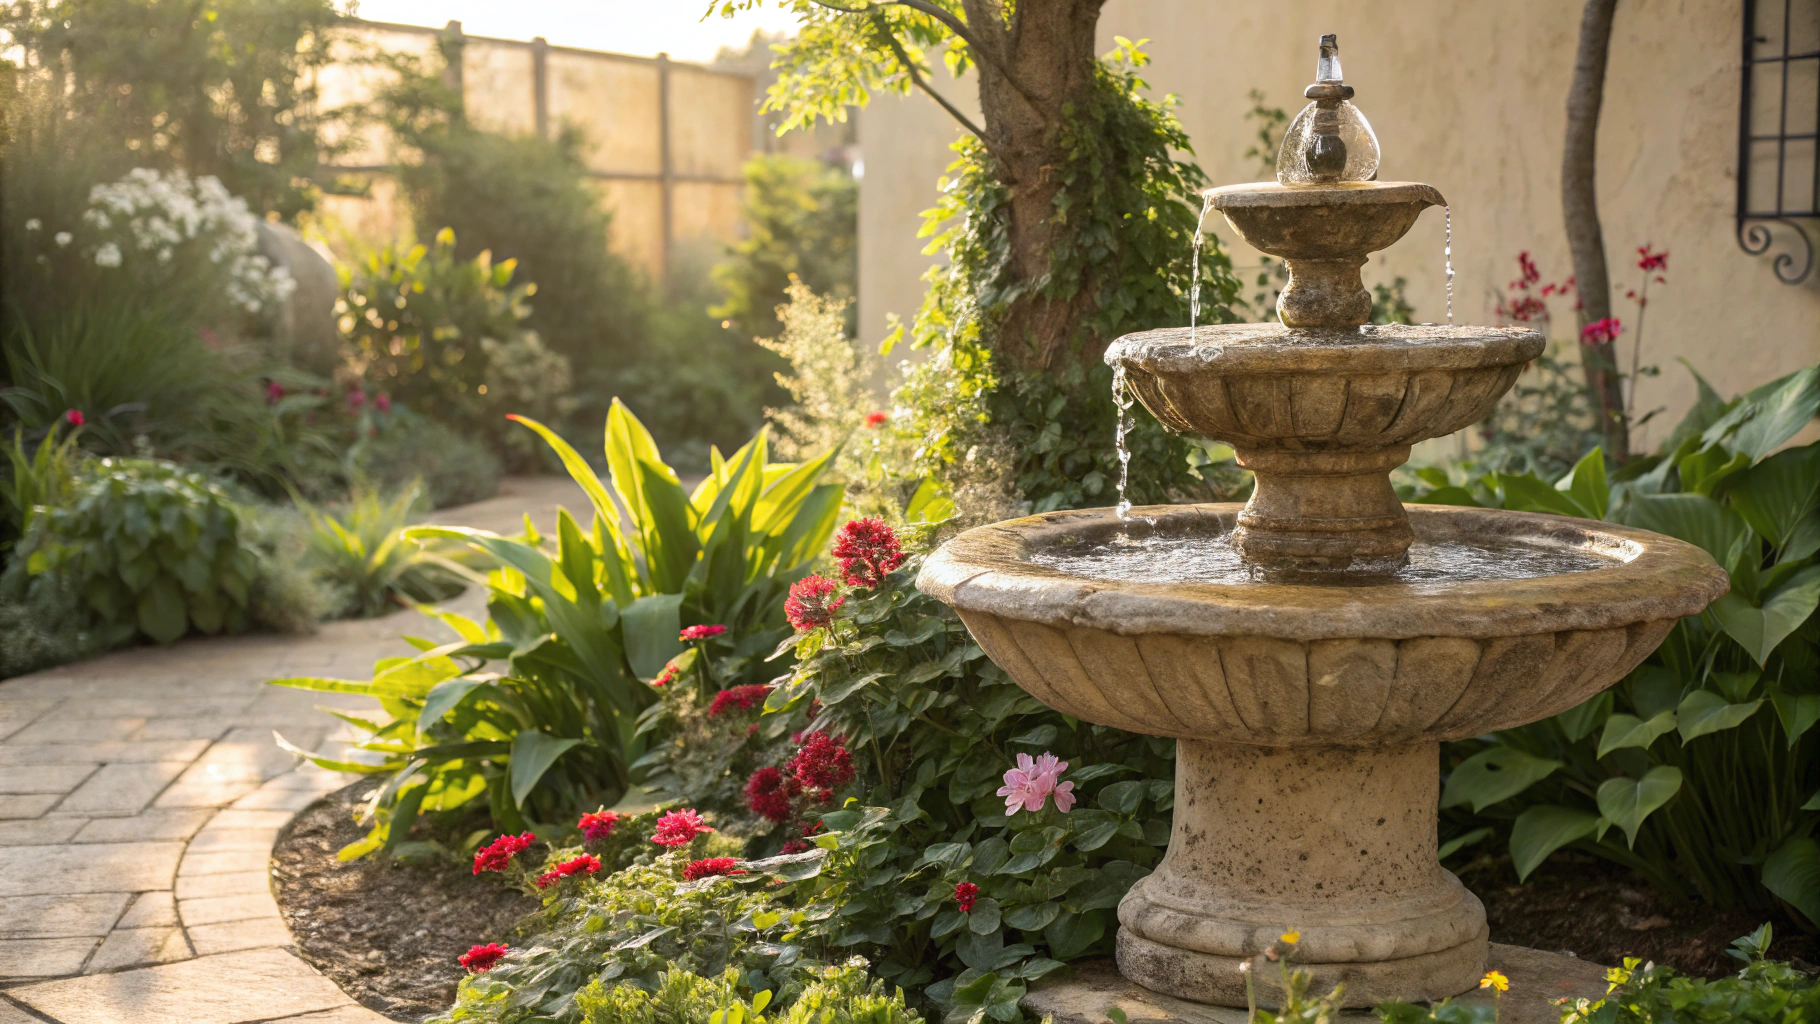
- Tiered fountain: Water cascades through multiple levels
- Natural rock fountain: Mimicking a natural spring or waterfall
Fountain Size Considerations
| Fountain Size | Space Required | Pump Size | Best For |
|---|---|---|---|
| Small (1-2 ft) | 3-4 sq ft | 50-120 GPH | Patios, small gardens, tabletops |
| Medium (2-3 ft) | 6-9 sq ft | 120-250 GPH | Garden beds, courtyards |
| Large (3+ ft) | 12+ sq ft | 250-500 GPH | Focal points, larger landscapes |
“The sound of water is therapeutic. When designing your fountain, consider what water sounds you find most relaxing—gentle trickles, steady streams, or dramatic splashes.” – Garden design expert Sarah Mitchell
Step 2: Gather and Prepare Materials for Your DIY Water Fountain
With your design plan in place, it’s time to collect everything you’ll need for your DIY water fountain project and prepare your materials.
Sourcing Quality Materials
When gathering materials for your DIY water fountain, quality matters. Here’s what to look for:
- Pump: Choose a submersible pump with adjustable flow rate. For longevity, select a model with ceramic bearings rather than plastic ones.
- Container: Ensure it’s waterproof and weather-resistant. Terra cotta needs sealing; glazed ceramics, fiberglass, and plastic containers are naturally waterproof.
- Decorative elements: Use materials safe for water contact. Avoid metals that can corrode and leach into water.
- Tubing: Select UV-resistant, flexible tubing that won’t crack or degrade in sunlight.
Preparing Your Container
Follow these steps to prepare your main fountain container:
- Clean thoroughly to remove any dirt or manufacturing residues
- If using porous materials like terra cotta or concrete, apply 2-3 coats of waterproof sealant
- Allow sealant to cure completely (typically 24-48 hours)
- Drill a hole for the power cord if using a container without pre-existing access
- Test for water-tightness by filling with water and checking for leaks over 24 hours
DIY Fountain Material Checklist
- Water pump with appropriate GPH rating
- Main decorative container or basin
- Secondary decorative elements
- Waterproof sealant (if needed)
- Flexible tubing
- River rocks, glass beads, or decorative stones
- Grate or mesh for creating platforms
- Outdoor-rated extension cord
- GFI outlet protector for safety
Step 3: Assemble the Base and Pump System
This step focuses on creating the functional foundation of your DIY water fountain—the water circulation system that brings your creation to life.
Setting Up the Basin
- Level the ground where your fountain will sit
- Place your main container or dig a hole for a disappearing fountain basin
- Ensure the basin is perfectly level using a bubble level
- If creating a disappearing fountain, add a layer of sand at the bottom for stability
Installing the Pump
The pump is the heart of your DIY water fountain. Follow these steps for proper installation:
- Place the pump in the deepest part of your container
- Attach the tubing to the pump outlet (secure with clamps if needed)
- Route the power cord through the drilled access hole or over the edge
- Apply waterproof sealant around any cord holes
- Add a protective cover over the pump if recommended by manufacturer
Creating Water Flow Pathways
How you route water through your DIY water fountain will determine its appearance and sound. Consider:
- Straight vertical tubes for dramatic height
- Curved pathways for gentle cascading effects
- Multiple outlet points for complex water patterns
- Narrow tubes for faster, more animated water flow
- Wider openings for gentler, more subtle movement
Pump Sizing Chart for DIY Water Fountains
| Feature Height | Feature Width | Recommended GPH |
|---|---|---|
| Under 1 foot | Small | 50-100 GPH |
| 1-2 feet | Small to Medium | 100-200 GPH |
| 2-3 feet | Medium | 200-300 GPH |
| 3-4 feet | Medium to Large | 300-400 GPH |
| Over 4 feet | Large | 400+ GPH |
Step 4: Arrange Decorative Elements
Now comes the creative part of your DIY water fountain project—arranging the decorative elements that will give your fountain its unique character and visual appeal.
Creating Visual Interest
When decorating your DIY water fountain, consider these design principles:
- Focal point: Position one dominant element to draw the eye
- Balance: Arrange elements symmetrically or asymmetrically according to your style preference
- Scale: Ensure decorative pieces are proportional to your fountain’s overall size
- Texture: Combine smooth and rough surfaces for visual contrast
- Color: Choose a cohesive palette that complements your garden
Securing Decorative Elements
Safety is crucial when building your DIY water fountain. Ensure all elements are secure:
- Use waterproof construction adhesive for permanent fixtures
- Create stable platforms with wire mesh or grates
- Position heavier elements at the bottom for stability
- Ensure no decorative pieces can topple into the pump
- Test stability before adding water
Popular Decorative Materials
| Material | Pros | Cons | Maintenance |
|---|---|---|---|
| Natural stone | Authentic look, durable | Heavy, can be expensive | Minimal cleaning |
| Ceramic pots | Versatile designs, lightweight | Can crack in freezing temps | Regular cleaning to prevent algae |
| Glass | Reflects light beautifully | Fragile, can shatter | Regular cleaning to maintain brilliance |
| Copper elements | Develops attractive patina | Can discolor water | Periodic cleaning to control patina |
| Bamboo | Natural, renewable | Deteriorates over time | Annual replacement may be needed |
Step 5: Final Setup and Maintenance
The last step of your DIY water fountain project involves filling and testing your creation, then establishing a maintenance routine to keep it running beautifully for years to come.
Testing Your Fountain
Before finalizing your DIY water fountain, perform these essential tests:
- Fill the basin with clean water to the appropriate level
- Plug the pump into a GFCI-protected outlet
- Check for proper water circulation and flow
- Listen for any unusual pump sounds that might indicate problems
- Make adjustments to water flow and decorative elements as needed
- Ensure water isn’t splashing outside the fountain area
Regular Maintenance Tasks
To keep your DIY water fountain looking and functioning its best:
- Daily: Check water level and top off as needed, especially in hot weather
- Weekly: Remove debris like leaves or twigs
- Monthly: Clean pump filter and check for calcium deposits
- Seasonally: Drain completely and clean all components
- Annually: Replace pump if performance has diminished (typical lifespan 1-3 years)
Seasonal Considerations
| Season | Maintenance Tasks |
|---|---|
| Spring | Deep clean, replace pump if needed, check for winter damage |
| Summer | Monitor water levels daily, add algae prevention if needed |
| Fall | Clear fallen leaves regularly, prepare for winter |
| Winter | In freezing climates: drain, clean, and store pump indoors |
Troubleshooting Common DIY Fountain Problems
- Low water flow: Clean pump filter, check for kinks in tubing
- Pump runs but no water: Check for air lock—unplug, reset, and restart
- Excessive splashing: Adjust flow rate or reposition decorative elements
- Algae growth: Add fountain algae treatment, relocate to shadier spot
- Calcium deposits: Clean with white vinegar solution (1:4 with water)
Adding the Finishing Touches
Complete your DIY water fountain project with these final enhancements:
- Install subtle lighting to highlight your fountain at night
- Add aquatic plants in or around the fountain if appropriate
- Place seating nearby to create a relaxation zone
- Consider adding a timer to automate fountain operation
- Take photos to document your achievement!
Showcasing DIY Water Fountain Styles
Top 5 DIY Water Fountain Designs
Stacked Stone Column
- Materials: Flat stones, PVC pipe, plastic basin
- Difficulty: Moderate
- Cost: $75-150
- Perfect for: Natural landscapes, zen gardens
Repurposed Pottery Fountain
- Materials: Ceramic pots, pump, tubing
- Difficulty: Easy
- Cost: $50-100
- Perfect for: Cottage gardens, patios
Solar Birdbath Fountain
- Materials: Birdbath, solar pump, decorative stones
- Difficulty: Very easy
- Cost: $30-75
- Perfect for: Bird lovers, eco-conscious gardeners
Wall-mounted Copper Spout
- Materials: Copper pipes, wall basin, pump
- Difficulty: Moderate to difficult
- Cost: $100-200
- Perfect for: Modern landscapes, small spaces
Disappearing Rock Fountain
- Materials: Decorative boulders, underground basin, heavy-duty pump
- Difficulty: Difficult
- Cost: $150-300
- Perfect for: Statement features, natural-looking landscapes
Conclusion
Creating a DIY water fountain transforms your outdoor space into a personal sanctuary where the gentle sounds of flowing water can wash away daily stress. By following these five simple steps—planning, gathering materials, assembling the base, arranging decorative elements, and finalizing setup—you’ve created more than just a water feature; you’ve crafted a focal point that enhances your garden’s appeal while providing countless hours of sensory enjoyment.
Remember that your DIY water fountain is an evolving project. Don’t be afraid to make adjustments as you live with your creation. Change decorative elements seasonally, adjust water flow as you discover your preferences, and perhaps even create additional fountains for different areas of your garden.
The satisfaction of building something beautiful with your own hands is immeasurable. I hope the sound of your DIY water fountain brings you the same joy and tranquility that mine has brought me. Happy building!
Frequently Asked Questions About DIY Water Fountains
Q: How much does it typically cost to build a DIY water fountain?
A: A DIY water fountain can cost anywhere from $30 to $300 depending on size, materials, and complexity. The most basic tabletop DIY water fountain might cost around $30-50, while larger, more elaborate installations can run $200-300. This represents significant savings compared to pre-made fountains, which often cost 2-3 times more.
Q: Do DIY water fountains use a lot of electricity?
A: No, DIY water fountains are quite energy-efficient. A typical small to medium submersible pump uses approximately 5-20 watts, similar to a small LED light bulb. This translates to very minimal impact on your electricity bill—often less than $2-3 per month if run continuously.
Q: How can I prevent algae in my DIY water fountain?
A: To prevent algae in your DIY water fountain, position it in partial shade, add algae-preventing additives made for fountains, change the water weekly, and clean the fountain monthly. You can also add a few drops of fountain enzyme treatment weekly, which helps break down organic matter that feeds algae.
Q: Can I make my DIY water fountain solar-powered?
A: Yes, you can create a solar-powered DIY water fountain by using a solar pump instead of an electrical one. Solar fountains work best in full-sun locations and typically include a small solar panel that powers the pump directly. Be aware that flow may diminish on cloudy days or stop completely at night unless your solar system includes battery backup.
Q: How do I winterize my outdoor DIY water fountain?
A: To winterize your DIY water fountain, unplug the pump, drain all water completely, clean all components thoroughly, and store the pump indoors. For larger fountains that cannot be moved, cover with a weatherproof fountain cover after draining. In milder climates where freezing is rare, you may continue running the fountain, but never let it run dry or with ice forming.